 : +86-139 0587 7291
 انگلیسی
 اسپانیا
 Русский
 فرانسه
 العربية
 Português do Brasil
 اوکراین
 ترکچه
ترکچه پولسکی
 هلند
هلند ایتالیایی
 باهاسا اندونزی
 हिन्दी
 اردو
اردو አማርኛ
አማርኛ فارسی
فارسی ไทย
ไทย منگول
منگول فارسی
فارسی زبان فارسی
 زبان
زبان

سوئیچ تایمر مکانیکی: انواع، نحوه استفاده و موارد دیگر
Table of Contents
تغییر وضعیت دهید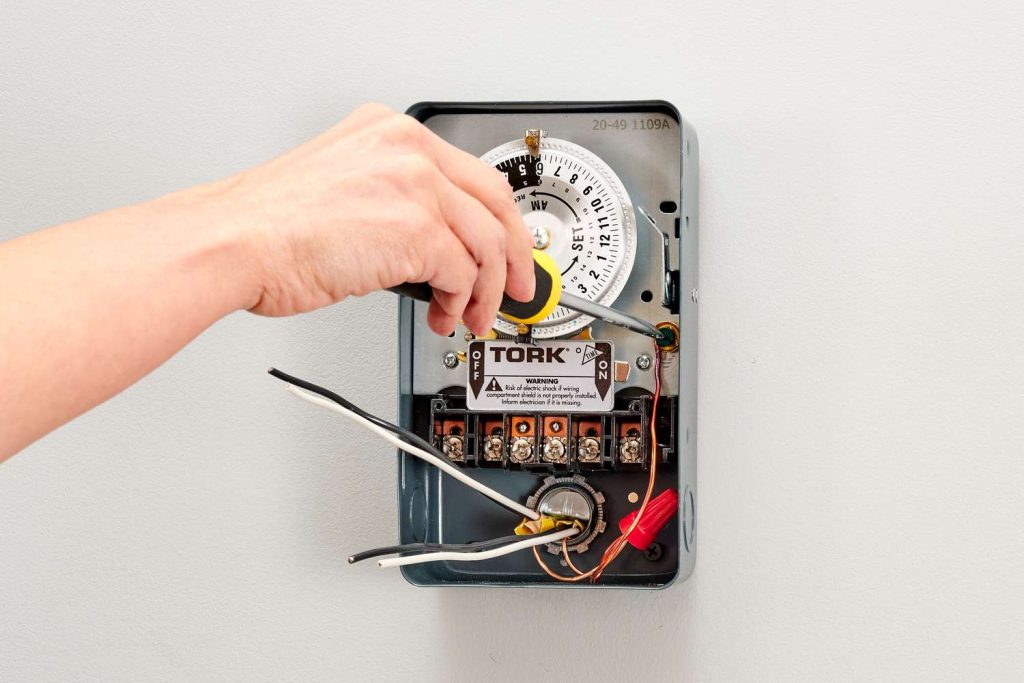
A mechanical timer switch, also referred to as an analog سوئیچ تایمر، یک دستگاه زمان بندی است که از اجزای فیزیکی مانند فنرها، چرخ دنده ها و موتورهای الکتریکی برای تنظیم منبع تغذیه یک دستگاه الکتریکی استفاده می کند.
برای کسب اطلاعات بیشتر در مورد این دستگاه، در اینجا یک راهنمای عملی برای شروع ارائه شده است.
سوئیچ تایمر مکانیکی چگونه کار می کند؟
با عملکرد آنالوگ، از مکانیسم های ساعت برای تعیین زمان روشن و خاموش کردن برق استفاده می کند.
این نوع سوئیچ تایمر به صورت دستی با تنظیم یک دستگیره برای تنظیم فاصله زمانی مورد نظر برای روشن یا خاموش کردن برق پیکربندی می شود.
اگرچه کلیدهای تایمر مکانیکی مقرون به صرفه و پیکربندی ساده هستند، اما به دلیل استفاده از قطعات متحرک ممکن است بزرگتر باشند و نیاز به نگهداری بیشتری داشته باشند.
آنها معمولاً برای مدیریت روشنایی، لوازم خانگی و سایر دستگاه های الکتریکی به کار می روند و ابزاری مقرون به صرفه برای خودکارسازی سیستم های مختلف ارائه می دهند.
با وجود ظهور تایمرهای دیجیتال و الکترونیکی پیچیده تر، سوئیچ های تایمر مکانیکی گزینه ای ساده و مقرون به صرفه برای نظارت بر چراغ ها و سایر دستگاه ها هستند.
انواع تایمرهای مکانیکی
Mechanical timer switches can be categorized by several factors. Understanding these types helps you choose the right model for your specific application.
By Time Cycle
- 24-Hour Mechanical Timer: The dial completes one full rotation every 24 hours. Best suited for daily routines that repeat the same pattern every day, such as turning porch lights on at dusk and off at dawn. Each pin typically represents a 15-minute block, giving you up to 96 ON/OFF segments per day.
- 7-Day Mechanical Timer: The dial completes one rotation every 7 days, allowing different schedules for weekdays and weekends. Ideal for commercial settings where operating hours vary — for example, a shop sign that needs to stay on later on Fridays and Saturdays.
By Installation Method
- Plug-In Timer: Plugs directly into a standard wall outlet. The appliance then plugs into the timer. No wiring required — ideal for residential use with lamps, fans, aquarium equipment, and small pumps.
- DIN Rail Mounted Timer: Installed inside an electrical panel on a standard DIN rail. Requires a hardwired connection by a qualified electrician. Used in commercial and industrial settings for controlling lighting circuits, irrigation systems, HVAC equipment, and motor-driven machinery.
By Number of Channels
- Single-Channel Timer: Controls one electrical circuit. Sufficient for most residential applications.
- Multi-Channel Timer: Controls two or more independent circuits from a single unit, each with its own ON/OFF schedule. Useful in commercial buildings where multiple systems (e.g., interior lights, exterior signs, ventilation) need independent timing.
By Contact Capacity
- Mechanical timers are rated by the maximum current they can safely switch. Residential plug-in models typically handle 10A–16A, suitable for lighting and small appliances. Industrial DIN rail models — like the TOSUNlux THC-15A — support up to 30A, capable of controlling heavier loads such as pumps, motors, and heating elements.
- When selecting a mechanical timer switch, match the timer’s rated amperage to your load. Connecting a device that draws more current than the timer’s rating will cause overheating and potential failure.
جاهایی که از کلیدهای تایمر مکانیکی استفاده می شود
سوئیچ های تایمر مکانیکی دستگاه های همه کاره ای هستند که برای اهداف مختلف استفاده می شوند. در اینجا به تفکیک موارد استفاده و فواید آنها می پردازیم:
- کنترل روشنایی: ایده آل برای خودکارسازی سیستم های روشنایی داخلی و خارجی.
- مدیریت لوازم خانگی: برای مدیریت وسایلی مانند اجاق گاز و پمپ آب مفید است.
- کنترل های HVAC: به تنظیم موثر سیستم های گرمایش و سرمایش کمک می کند.
- مقرون به صرفه: راه حلی مقرون به صرفه برای اتوماسیون سیستم های خانگی و صنعتی ارائه می دهد.
- کاربر پسند: به دلیل سادگی و سهولت استفاده آنها شناخته شده است و آنها را برای همه قابل دسترس می کند.
- بادوام: ساخته شده برای ماندگاری، ارائه قابلیت اطمینان در تنظیمات مختلف.
- مصارف صنعتی و خانگی: مناسب برای مصارف مسکونی و صنعتی.
علیرغم وجود سوئیچ های تایمر دیجیتالسوئیچ های تایمر مکانیکی به دلیل مقرون به صرفه بودن و کارکرد ساده، همچنان یک انتخاب محبوب هستند.
نحوه استفاده از سوئیچ های تایمر مکانیکی
برای اجرای یک تایمر یا سوئیچ آنالوگ، به یک سیستم موجود، چه در مقیاس صنعتی یا شخصی نیاز دارید.
نمونه هایی از سیستم های شخصی شامل تنظیم موتورهای آکواریوم، فیلترها و چراغ ها است.
در حالی که مدلهای دیجیتال تنظیمات دقیق را تا دومی امکانپذیر میسازند، ساعتهای زمانی آنالوگ مکانیکی کاربرپسند هستند و نقطه شروع و پایان را با بریدگیهایی روی ساختار دایرهای نشان میدهند.
انحرافات + یا – 5 دقیقه ممکن است در کلیدهای مکانیکی رخ دهد.
برای مدلهای دیجیتال، برنامههای هفتگی، روزانه و ساعتی با تنظیمات دقیق دقیقه امکانپذیر است که کنترل دقیقی را فراهم میکند.
انتخاب نوع و مدل تایمر مناسب - دیجیتال یا آنالوگ - به هدف و نیازهای خاص کار در دست بستگی دارد.
نحوه تنظیم سوئیچ تایمر مکانیکی
برای پیکربندی سوئیچ تایمر مکانیکی، این مراحل کلی را دنبال کنید:
- تایمر را به دیوار و دستگاه را به تایمر وصل کنید.
- شماره گیری را برای تنظیم زمان فعلی تنظیم کنید.
- Press down the pins for the times you want the device to activate, and keep them pulled out for when you want the device to deactivate.
- در صورت موجود بودن، تایمر را روی حالت «روشن-خاموش» تنظیم کنید.
- دکمه سوئیچ دستی را به تنظیمات "تایمر" تغییر دهید.
این مراحل ممکن است بر اساس مدل خاص سوئیچ تایمر مکانیکی کمی متفاوت باشد.
مهم است: برای راهنمایی دقیق همیشه از دستورالعمل های سازنده استفاده کنید.
نحوه تعمیر سوئیچ تایمر مکانیکی که کار نمی کند
برای رسیدگی به مشکلات سوئیچ تایمر مکانیکی خراب، این مراحل عیبیابی کلی را که از نتایج جستجو بدست میآیند در نظر بگیرید:
- مرحله 1: تنظیمات تایمر را تأیید کنید: مطمئن شوید که تایمر به درستی تنظیم شده است، زیرا تنظیمات نادرست می تواند منجر به نقص غیرمنتظره شود.
- مرحله 2: سیم کشی تایمر را بررسی کنید: از سیم کشی و توزیع برق مناسب اطمینان حاصل کنید و پایانه های شلی را که ممکن است جریان برق را مختل کنند، بررسی کنید.
- مرحله 3: قطعات شکسته یا گیر کرده را بررسی کنید: تایمر را برای یافتن دنده ها یا فنرهای آسیب دیده که در اثر عواملی مانند سن، کثیفی یا زباله ایجاد می شود، بررسی کنید. چرخ دنده های گیر کرده را روغن کاری کنید و در صورت لزوم آنهایی که شکسته اند تعویض کنید.
- مرحله 4: تأیید منبع تغذیه و فیوز: منبع تغذیه کافی را تأیید کنید و فیوز سوخته را بررسی کنید، زیرا ولتاژ ناکافی یا سوختن فیوز می تواند بر عملکرد تایمر تأثیر بگذارد.
- مرحله 5: تعویض باتری: اگر تایمر به باتری ها متکی است، اگر صفحه نمایش مشخص نیست یا تایمر به درستی کار نمی کند، آنها را تعویض کنید.
- مرحله 6: تراز تریپر و چرخ دنده را بررسی کنید: تریپرها و دنده ها را از نظر آسیب یا ناهماهنگی بررسی کنید. دنده ها را تمیز کنید و از تراز مناسب تریپرها برای زمان بندی دقیق روشن/خاموش اطمینان حاصل کنید.
همیشه دستورالعملهای سازنده خاص را برای مراحل عیبیابی جامع رجوع کنید، زیرا این فرآیند ممکن است بسته به مدل سوئیچ تایمر مکانیکی متفاوت باشد.
غذای آماده کلیدی
تایمرهای آنالوگ یا مکانیکی دستگاه هایی هستند که عملکرد ماشین ها یا سیستم های الکتریکی را مدیریت می کنند و آنها را بر اساس یک برنامه از پیش تعیین شده روشن و خاموش می کنند.
هدف اصلی صرفه جویی در انرژی است و تایمرها را به یک انتخاب عملی تبدیل می کند.
با متوقف کردن دستگاه های مصرف کننده انرژی در مواقعی که نیازی به آنها نیست، نه تنها در مصرف برق صرفه جویی می کنید بلکه راحتی کاربر را نیز افزایش می دهید.
این رویکرد عمدی برای کنترل عملکرد دستگاه به بهره وری انرژی و حرفه ای بودن سیستم کمک می کند.
Mechanical Timer Switch vs Digital Timer Switch
Mechanical Timer Switch vs Digital Timer Switch
Both mechanical (analog) and digital timer switches serve the same fundamental purpose — automating when electrical devices turn on and off. However, they differ significantly in how they achieve this. Here is a practical comparison to help you choose the right type.
| ویژگی | سوئیچ تایمر مکانیکی | Digital Timer Switch |
| Timing Accuracy | ±5 minutes | ±1 second |
| Programming Method | Push physical pins on a dial | Button-based, LCD screen interface |
| Minimum Time Interval | 15 minutes (per pin) | 1 minute or 1 second |
| Number of Programs | Simple daily schedules, budget installations, and environments without reliable power | 8–20+ independent programs |
| Weekday/Weekend Scheduling | Only on 7-day models | Standard on most models |
| Power Outage Behavior | Schedule shifts by outage duration (no battery) | Battery backup retains schedule (typically 3V lithium) |
| Price Range | $5 – $20 (residential); $15 – $50 (industrial) | $15 – $60 (residential); $30 – $120 (industrial) |
| طول عمر | 5–10 years (moving parts wear over time) | 8–15 years (no moving parts) |
| تعمیر و نگهداری | Periodic cleaning and lubrication of gears | Minimal; battery replacement every 3–5 years |
| سر و صدا | Faint ticking/clicking from motor and gears | Silent |
| Ease of Setup | Very easy — push pins, no manual needed | Moderate — requires reading the manual to program |
| بهترین برای | Simple daily schedules, budget installations, environments without reliable power | Complex multi-program schedules, second-level precision, setups with frequent power outages |
When to Choose Mechanical: If your application follows a simple, repeating daily pattern (e.g., lights on at 6 PM, off at 11 PM every day) and you want the lowest upfront cost with zero programming complexity, a mechanical timer is the practical choice.
When to Choose Digital: If you need different schedules for different days of the week, second-level precision, or the schedule must survive power outages without resetting, a digital timer is worth the extra cost.
TOSUNlux offers both types. The THC-15A digital programmable timer supports 24-hour / 7-day scheduling with a contact capacity of up to 30A, making it suitable for both light and heavy-duty applications.
توصیه محصول

TOSUNlux THC-15A Programmable Timer Switch
Based on the requirements discussed throughout this guide, the TOSUNlux THC-15A is a versatile option that bridges the gap between simple mechanical timers and fully programmable digital controllers.
Key Specifications:
| مشخصات | Detail |
| Timer Type | Digital programmable |
| Time Cycle | 24-hour and 7-day scheduling |
| ظرفیت تماس | 16A – 30A |
| Minimum Program Interval | 1 minute |
| Number of ON/OFF Programs | Up to 17 per day |
| نصب | DIN rail (35mm standard) |
| Power Outage Protection | Built-in lithium battery backup |
| نمایش | LCD with backlight |
Why It Fits Common Use Cases
- For lighting control: Supports separate weekday and weekend schedules, eliminating the manual adjustment needed with basic mechanical timers.
- For industrial motor control: The 30A contact capacity handles pumps, fans, and motors without requiring an external contactor for loads under 30A.
- For environments with frequent power outages: The battery backup retains your programmed schedule, so you do not need to reset the timer after every blackout.
TOSUNlux also manufactures circuit breakers, contactors, isolating switches, and distribution boards. Visit tosunlux.eu to request a quotation or browse the full product catalog.
سوالات متداول
Q1: How long does a mechanical timer switch last?
A well-maintained mechanical timer switch typically lasts 5 to 10 years. Lifespan depends on usage frequency, environmental conditions, and regular maintenance of moving parts like gears and springs. Timers used in dusty or humid environments may require more frequent cleaning to reach their full lifespan.
Q2: Can I use a mechanical timer switch outdoors?
Yes, but you need an outdoor-rated model with an appropriate IP rating — typically IP44 or higher — to protect against moisture and dust. Always install outdoor timers inside a weatherproof enclosure, and avoid direct exposure to rain or sprinkler spray.
Q3: What is the difference between a mechanical and a digital timer switch?
Mechanical timer switches use physical gears and springs with ±5-minute accuracy, while digital timers use electronic circuits for precision down to the second. Mechanical timers are more affordable and easier to set up, while digital timers offer more programming flexibility and battery-backed memory that survives power outages.
Q4: Why is my mechanical timer switch not turning off?
Common causes include stuck or misaligned pins (trippers), worn-out gears, or a faulty switch contact. First check that the pins for OFF periods are fully in the raised position. Then inspect the mechanism for debris or gear damage. If the timer motor is running but the switch does not disengage, the internal contact may be welded shut from switching high-current loads — in this case, replace the timer.
Q5: How do I reset a mechanical timer switch?
Pull all pins (trippers) to the OFF (raised) position, then rotate the dial clockwise until the arrow aligns with the correct current time. After that, push down only the pins for your desired ON periods. Finally, set the mode switch to “Auto” or “Timer” to activate the schedule.
Q6: Can a mechanical timer switch save electricity?
Yes. By automatically turning off devices when they are not needed — such as lights, pumps, and heaters — a mechanical timer can reduce energy waste by 10% to 30%, depending on the application and how many hours per day the device was previously running unnecessarily.
Q7: What is the maximum load for a mechanical timer switch?
Most residential plug-in mechanical timers handle 10A to 16A (approximately 1,150W to 1,840W at 115V, or 2,200W to 3,520W at 220V). Industrial DIN rail models like the TOSUNlux THC-15A support up to 30A. Always check the timer’s rated current on its label before connecting any appliance, and never exceed the stated capacity.
وبلاگ های اخیر

درخواست یک نقل قول
تلفن: +86-577-88671000
ایمیل: [email protected]
اسکایپ: tosenelectric
ویچت: +86-139 6881 9286
واتس اپ: +86-139 0587 7291
آدرس: اتاق No.1001 Wenzhou Fortune Center, Station Road, Wenzhou, China
درخواست یک نقل قول
واتساپ ما