 : +86-139 0587 7291
 Անգլերեն
 Իսպանիայի
 Русский
 ֆրանս
ֆրանս العربية
 Português do Brasil
 Українська
 Թյուրքչե
 Պոլսկին
 Նիդեռլանդներ
 Իտալական
 Բահասա Ինդոնեզիա
 हिन्दी
 اردو
اردو አማርኛ
አማርኛ Հայերեն
 ไทย
ไทย մոնղոլ
 հայերեն
 Shqip
Shqip English

Մեխանիկական ժմչփ անջատիչ. տեսակներ, ինչպես օգտագործել և այլն
Table of Contents
Փոխարկել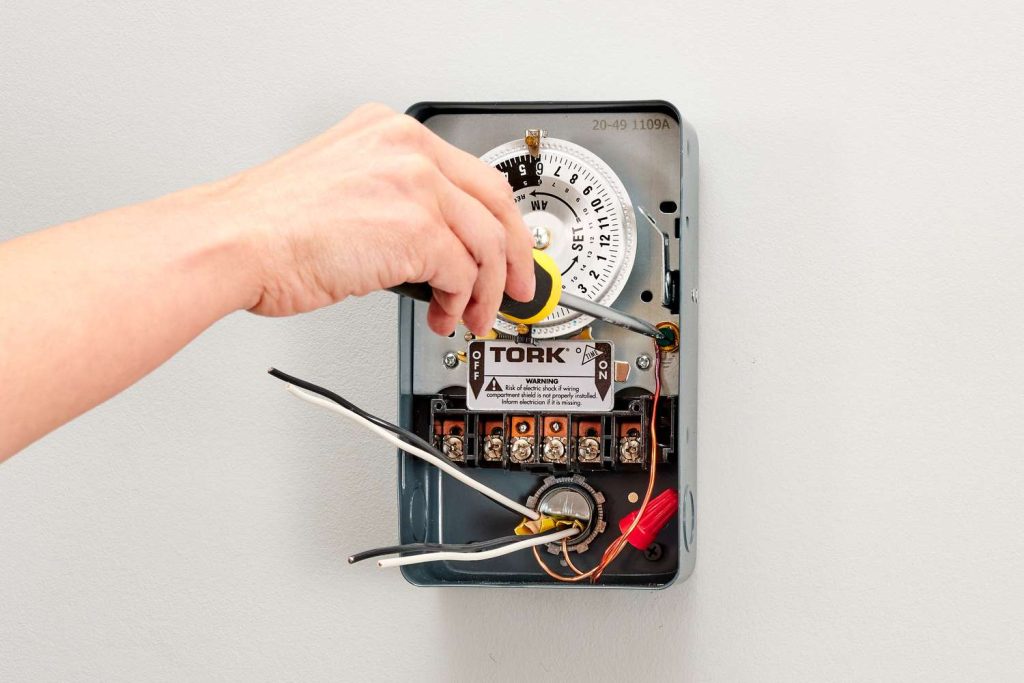
A mechanical timer switch, also referred to as an analog ժմչփ անջատիչ, ժամանակավոր սարք է, որն օգտագործում է ֆիզիկական բաղադրիչներ, ինչպիսիք են զսպանակները, շարժակներն ու էլեկտրական շարժիչները՝ էլեկտրական սարքի սնուցումը կարգավորելու համար:
Այս սարքի մասին ավելին իմանալու համար ստորև ներկայացված է գործնական ուղեցույց՝ սկսելու համար:
Ինչպե՞ս է աշխատում մեխանիկական ժմչփ անջատիչը:
Գործելով անալոգային եղանակով՝ այն օգտագործում է ժամացույցի մեխանիզմներ՝ որոշելու, թե երբ է միացնել և անջատել հոսանքը:
Այս տեսակի ժմչփի անջատիչը ձեռքով կազմաձևվում է՝ կարգավորելով կոճակը՝ միացնելու կամ անջատելու համար ցանկալի ժամանակային միջակայքը սահմանելու համար:
Թեև մեխանիկական ժամանակաչափ անջատիչները ծախսարդյունավետ են և պարզ կարգավորելու համար, դրանք կարող են ավելի մեծ լինել և պահանջել ավելի շատ սպասարկում՝ շարժական մասերի օգտագործման պատճառով:
Սովորաբար օգտագործվում են լուսավորության, տեխնիկայի և այլ էլեկտրական սարքերի կառավարման համար, դրանք առաջարկում են տարբեր համակարգերի ավտոմատացման խնայող միջոցներ:
Չնայած ավելի բարդ թվային և էլեկտրոնային ժամանակաչափերի առաջացմանը, մեխանիկական ժմչփ անջատիչները մնում են պարզ և բյուջետային տարբերակ լույսերը և այլ սարքերը վերահսկելու համար:
Մեխանիկական ժամանակաչափերի տեսակները
Mechanical timer switches can be categorized by several factors. Understanding these types helps you choose the right model for your specific application.
By Time Cycle
- 24-Hour Mechanical Timer: The dial completes one full rotation every 24 hours. Best suited for daily routines that repeat the same pattern every day, such as turning porch lights on at dusk and off at dawn. Each pin typically represents a 15-minute block, giving you up to 96 ON/OFF segments per day.
- 7-Day Mechanical Timer: The dial completes one rotation every 7 days, allowing different schedules for weekdays and weekends. Ideal for commercial settings where operating hours vary — for example, a shop sign that needs to stay on later on Fridays and Saturdays.
By Installation Method
- Plug-In Timer: Plugs directly into a standard wall outlet. The appliance then plugs into the timer. No wiring required — ideal for residential use with lamps, fans, aquarium equipment, and small pumps.
- DIN Rail Mounted Timer: Installed inside an electrical panel on a standard DIN rail. Requires a hardwired connection by a qualified electrician. Used in commercial and industrial settings for controlling lighting circuits, irrigation systems, HVAC equipment, and motor-driven machinery.
By Number of Channels
- Single-Channel Timer: Controls one electrical circuit. Sufficient for most residential applications.
- Multi-Channel Timer: Controls two or more independent circuits from a single unit, each with its own ON/OFF schedule. Useful in commercial buildings where multiple systems (e.g., interior lights, exterior signs, ventilation) need independent timing.
By Contact Capacity
- Mechanical timers are rated by the maximum current they can safely switch. Residential plug-in models typically handle 10A–16A, suitable for lighting and small appliances. Industrial DIN rail models — like the TOSUNlux THC-15A — support up to 30A, capable of controlling heavier loads such as pumps, motors, and heating elements.
- When selecting a mechanical timer switch, match the timer’s rated amperage to your load. Connecting a device that draws more current than the timer’s rating will cause overheating and potential failure.
Որտեղ են օգտագործվում մեխանիկական ժմչփ անջատիչներ
Մեխանիկական ժմչփ անջատիչները բազմակողմանի սարքեր են, որոնք օգտագործվում են տարբեր նպատակների համար: Ահա դրանց օգտագործման և առավելությունների ամփոփումը.
- Լուսավորության վերահսկումԻդեալական է ներքին և արտաքին լուսավորության համակարգերի ավտոմատացման համար:
- Սարքավորումների կառավարումՕգտակար է այնպիսի սարքերի կառավարման համար, ինչպիսիք են ջեռոցները և ջրի պոմպերը:
- HVAC վերահսկումՕգնում է արդյունավետորեն կարգավորել ջեռուցման և հովացման համակարգերը:
- Ծախսերի արդյունավետՏրամադրում է մատչելի լուծում տնային և արդյունաբերական համակարգերի ավտոմատացման համար:
- Օգտագործողի համար հարմարՀայտնի են իրենց պարզությամբ և օգտագործման հեշտությամբ՝ դրանք հասանելի դարձնելով բոլորին:
- ԵրկարակյացԿառուցված է երկարակեցության համար, որն առաջարկում է հուսալիություն տարբեր պարամետրերում:
- Արդյունաբերական և տնային օգտագործման համարՀարմար է ինչպես բնակելի, այնպես էլ արդյունաբերական օգտագործման համար:
Չնայած առկայությանը թվային ժմչփ անջատիչներ, մեխանիկական ժմչփ անջատիչները շարունակում են մնալ հանրաճանաչ ընտրություն՝ շնորհիվ իրենց մատչելիության և պարզ շահագործման:
Ինչպես օգտագործել մեխանիկական ժմչփ անջատիչներ
Ժամաչափ կամ անալոգային անջատիչ իրականացնելու համար ձեզ անհրաժեշտ է գոյություն ունեցող համակարգ, լինի դա արդյունաբերական կամ անհատական մասշտաբով:
Անձնական համակարգերի օրինակները ներառում են ակվարիումի շարժիչների, ֆիլտրերի և լույսերի կարգավորիչ:
Մինչ թվային մոդելները թույլ են տալիս ճշգրիտ ճշգրտումներ կատարել մինչև երկրորդը, ժամանակի մեխանիկական անալոգային ժամացույցները հարմար են օգտագործման համար՝ նշելով սկզբի և վերջի կետերը շրջանաձև կառուցվածքի վրա կտրվածքներով:
Մեխանիկական անջատիչներում կարող են առաջանալ + կամ – 5 րոպեի շեղումներ:
Թվային մոդելների համար հնարավոր են շաբաթական, ամենօրյա և ժամային պլաններ՝ րոպեների ճշգրիտ կարգավորումներով՝ ապահովելով մանրամասն վերահսկողություն:
Ժամաչափի համապատասխան տեսակի և մոդելի ընտրությունը՝ թվային կամ անալոգային, կախված է առաջադրանքի նպատակից և կոնկրետ պահանջներից:
Ինչպես կարգավորել մեխանիկական ժմչփի անջատիչը
Մեխանիկական ժամանակաչափի անջատիչը կարգավորելու համար հետևեք այս ընդհանուր քայլերին.
- Ժմչփը միացրեք պատին, իսկ սարքը՝ ժմչփին:
- Կարգավորեք հավաքեքը՝ ընթացիկ ժամը սահմանելու համար:
- Press down the pins for the times you want the device to activate, and keep them pulled out for when you want the device to deactivate.
- Եթե առկա է, ժմչփը դրեք «On-Auto-Off» ռեժիմի վրա:
- Անցեք ձեռքով անջատիչ կոճակը «Ժամաչափ» պարամետրին:
Այս քայլերը կարող են մի փոքր տարբերվել՝ ելնելով մեխանիկական ժմչփ անջատիչի հատուկ մոդելից:
ԿարևորՄիշտ դիմեք արտադրողի հրահանգներին՝ ճշգրիտ ուղեցույցի համար:
Ինչպես ուղղել մեխանիկական ժամաչափի անջատիչը, որը չի աշխատում
Անսարք մեխանիկական ժմչփի անջատիչի հետ կապված խնդիրները լուծելու համար դիտարկեք որոնման արդյունքներից բխող անսարքությունների վերացման այս ընդհանուր քայլերը.
- Քայլ 1. Ստուգեք ժմչփի կարգավորումներըՀաստատեք, որ ժամանակաչափը ճիշտ է դրված, քանի որ սխալ կարգավորումները կարող են հանգեցնել անսպասելի անսարքությունների:
- Քայլ 2. Ստուգեք ժմչփի լարերըԱպահովեք էլեկտրական լարերի և էլեկտրաէներգիայի պատշաճ բաշխում` անդրադառնալով չամրացված տերմինալներին, որոնք կարող են խաթարել էլեկտրական հոսքը:
- Քայլ 3. Ստուգեք կոտրված կամ խրված բաղադրիչների համարՍտուգեք ժմչփը վնասված շարժակների կամ զսպանակների համար, որոնք առաջացել են այնպիսի գործոններից, ինչպիսիք են տարիքը, կեղտը կամ բեկորները: Յուղեք խրված փոխանցումները և անհրաժեշտության դեպքում փոխեք կոտրվածները:
- Քայլ 4. Էլեկտրամատակարարման և ապահովիչների ստուգումՀաստատեք բավարար սնուցման աղբյուրը և ստուգեք պայթած ապահովիչը, քանի որ անբավարար լարումը կամ պայթած ապահովիչը կարող է ազդել ժամանակաչափի աշխատանքի վրա:
- Քայլ 5. Մարտկոցի փոխարինումԵթե ժմչփը հենվում է մարտկոցների վրա, փոխարինեք դրանք, եթե էկրանն անհասկանալի է կամ եթե ժմչփը ճիշտ չի աշխատում:
- Քայլ 6. Ուսումնասիրեք ճամփորդների և հանդերձանքի հավասարեցումըՍտուգեք շարժակների և շարժակների վնասների կամ սխալ դասավորության համար: Մաքրեք հանդերձանքները և ապահովեք ճամփորդների ճիշտ դասավորվածությունը՝ ճշգրիտ միացման/անջատման ժամանակի համար:
Միշտ դիմեք կոնկրետ արտադրողի հրահանգներին՝ անսարքությունների վերացման համապարփակ քայլերի համար, քանի որ գործընթացը կարող է տարբեր լինել՝ կախված մեխանիկական ժամաչափի անջատիչի մոդելից:
Key Takeaway
Անալոգային կամ մեխանիկական ժամանակաչափերը սարքեր են, որոնք կառավարում են էլեկտրական մեքենաների կամ համակարգերի աշխատանքը՝ միացնելով և անջատելով դրանք՝ նախապես որոշված ժամանակացույցի հիման վրա:
Առաջնային նպատակը էներգիայի պահպանումն է՝ ժամանակաչափերը դարձնելով գործնական ընտրություն:
Կանգնեցնելով էներգիա սպառող սարքերը, երբ դրանք անհրաժեշտ չեն, դուք ոչ միայն խնայում եք էլեկտրաէներգիան, այլև բարելավում եք օգտվողի հարմարավետությունը:
Սարքի աշխատանքը վերահսկելու այս կանխամտածված մոտեցումը նպաստում է ինչպես էներգաարդյունավետությանը, այնպես էլ համակարգի պրոֆեսիոնալիզմին:
Mechanical Timer Switch vs Digital Timer Switch
Mechanical Timer Switch vs Digital Timer Switch
Both mechanical (analog) and digital timer switches serve the same fundamental purpose — automating when electrical devices turn on and off. However, they differ significantly in how they achieve this. Here is a practical comparison to help you choose the right type.
| Առանձնահատկություն | Մեխանիկական ժմչփ անջատիչ | Digital Timer Switch |
| Timing Accuracy | ±5 minutes | ±1 second |
| Programming Method | Push physical pins on a dial | Button-based, LCD screen interface |
| Minimum Time Interval | 15 minutes (per pin) | 1 minute or 1 second |
| Number of Programs | Simple daily schedules, budget installations, and environments without reliable power | 8–20+ independent programs |
| Weekday/Weekend Scheduling | Only on 7-day models | Standard on most models |
| Power Outage Behavior | Schedule shifts by outage duration (no battery) | Battery backup retains schedule (typically 3V lithium) |
| Price Range | $5 – $20 (residential); $15 – $50 (industrial) | $15 – $60 (residential); $30 – $120 (industrial) |
| Կյանքի տեւողությունը | 5–10 years (moving parts wear over time) | 8–15 years (no moving parts) |
| Տեխնիկական սպասարկում | Periodic cleaning and lubrication of gears | Minimal; battery replacement every 3–5 years |
| Աղմուկ | Faint ticking/clicking from motor and gears | Silent |
| Ease of Setup | Very easy — push pins, no manual needed | Moderate — requires reading the manual to program |
| Լավագույնը | Simple daily schedules, budget installations, environments without reliable power | Complex multi-program schedules, second-level precision, setups with frequent power outages |
When to Choose Mechanical: If your application follows a simple, repeating daily pattern (e.g., lights on at 6 PM, off at 11 PM every day) and you want the lowest upfront cost with zero programming complexity, a mechanical timer is the practical choice.
When to Choose Digital: If you need different schedules for different days of the week, second-level precision, or the schedule must survive power outages without resetting, a digital timer is worth the extra cost.
TOSUNlux offers both types. The THC-15A digital programmable timer supports 24-hour / 7-day scheduling with a contact capacity of up to 30A, making it suitable for both light and heavy-duty applications.
Ապրանքի առաջարկություն

TOSUNlux THC-15A Programmable Timer Switch
Based on the requirements discussed throughout this guide, the TOSUNlux THC-15A is a versatile option that bridges the gap between simple mechanical timers and fully programmable digital controllers.
Key Specifications:
| Հստակեցում | Detail |
| Timer Type | Digital programmable |
| Time Cycle | 24-hour and 7-day scheduling |
| Կոնտակտային հզորություն | 16A – 30A |
| Minimum Program Interval | 1 minute |
| Number of ON/OFF Programs | Up to 17 per day |
| Մոնտաժում | DIN rail (35mm standard) |
| Power Outage Protection | Built-in lithium battery backup |
| Ցուցադրել | LCD with backlight |
Why It Fits Common Use Cases
- For lighting control: Supports separate weekday and weekend schedules, eliminating the manual adjustment needed with basic mechanical timers.
- For industrial motor control: The 30A contact capacity handles pumps, fans, and motors without requiring an external contactor for loads under 30A.
- For environments with frequent power outages: The battery backup retains your programmed schedule, so you do not need to reset the timer after every blackout.
TOSUNlux also manufactures circuit breakers, contactors, isolating switches, and distribution boards. Visit tosunlux.eu to request a quotation or browse the full product catalog.
ՀՏՀ
Q1: How long does a mechanical timer switch last?
A well-maintained mechanical timer switch typically lasts 5 to 10 years. Lifespan depends on usage frequency, environmental conditions, and regular maintenance of moving parts like gears and springs. Timers used in dusty or humid environments may require more frequent cleaning to reach their full lifespan.
Q2: Can I use a mechanical timer switch outdoors?
Yes, but you need an outdoor-rated model with an appropriate IP rating — typically IP44 or higher — to protect against moisture and dust. Always install outdoor timers inside a weatherproof enclosure, and avoid direct exposure to rain or sprinkler spray.
Q3: What is the difference between a mechanical and a digital timer switch?
Mechanical timer switches use physical gears and springs with ±5-minute accuracy, while digital timers use electronic circuits for precision down to the second. Mechanical timers are more affordable and easier to set up, while digital timers offer more programming flexibility and battery-backed memory that survives power outages.
Q4: Why is my mechanical timer switch not turning off?
Common causes include stuck or misaligned pins (trippers), worn-out gears, or a faulty switch contact. First check that the pins for OFF periods are fully in the raised position. Then inspect the mechanism for debris or gear damage. If the timer motor is running but the switch does not disengage, the internal contact may be welded shut from switching high-current loads — in this case, replace the timer.
Q5: How do I reset a mechanical timer switch?
Pull all pins (trippers) to the OFF (raised) position, then rotate the dial clockwise until the arrow aligns with the correct current time. After that, push down only the pins for your desired ON periods. Finally, set the mode switch to “Auto” or “Timer” to activate the schedule.
Q6: Can a mechanical timer switch save electricity?
Yes. By automatically turning off devices when they are not needed — such as lights, pumps, and heaters — a mechanical timer can reduce energy waste by 10% to 30%, depending on the application and how many hours per day the device was previously running unnecessarily.
Q7: What is the maximum load for a mechanical timer switch?
Most residential plug-in mechanical timers handle 10A to 16A (approximately 1,150W to 1,840W at 115V, or 2,200W to 3,520W at 220V). Industrial DIN rail models like the TOSUNlux THC-15A support up to 30A. Always check the timer’s rated current on its label before connecting any appliance, and never exceed the stated capacity.
Հեռ՝ +86-577-88671000
Էլ․ հասցե։ ceo@tosun.com
Skype՝ արևաէլեկտրական
Wechat՝ +86-139 6881 9286
WhatsApp՝ +86-139 0587 7291
Հասցե՝ Սենյակ No.1001 Wenzhou Fortune Center, Station Road, Wenzhou, Չինաստան
ՊԱՀԱՆՋԵԼ ՄԵԿՆԱՐԿ
WhatsApp մեզ